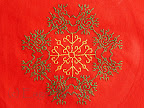
9/20/09

Happy Dasara!


Dasara brings such warm memories of childhood that it makes me want to be a kid again! Today's embroidery, 'Kalasha' is symbolic of Dasara as it is celebrated in South India. 'Kalasha' is a metal pot inside which are a few neatly tucked mango leaves and a coconut in the center. To me the embroidery also reminds me of my grandma. She lived in Chennai and would visit us every summer. During her stay, she would make me a special 'Kalasha' for the 'Golu' (Another South Indian tradition of proudly displaying one's collection of clay dolls, heirloom artifacts, travel souvenirs in steps). In our house, the centre piece was always grandma's meticulously decorated 'Kalasha' made from a few simple things - plastic pot, rubber ball, large gold sequins and of course, tons of pins!!

Well, whatever fond memories Dasara may bring to you, here is wishing everyone a Happy festival season!


9/10/09

From the City of the Nawabs...

Today, we travel to Lucknow, a busy city in the state of Uttar Pradesh. This city is worth visiting for two reasons. One, the amazing monuments and second, (more important!) to shop for some beautiful Chikankari work.

Chikankari is the Indian version of Whitework and Shadow work. The designs used are generally flowers and creepers. Another very common design is the mango. The embroidery is done predominently using white cotton thread on white fabric and other pastel shades of fabrics. This style also seems to fit the description of Shadow work because it is done on transparent and semi transparent fabrics like poplin, voile and chiffon. There are many stitches used in Chikankari, some specifically for the outlines, and others for filling the pattern to create the shadow. Besides this, there are the raised stitches that stand out quite well against the flat stitches and of course the jali work.

I have barely scratched the surface of this style and I have a long way to go in exploring and experimenting. Take a look at today's samples.

This piece is probably 8 years old
and is still one of my favorites. I bought it in a small store in
Bangalore. If you ignore the pilling
in the fabric, the embroidery looks bright to this day.

Chikankari has always been practiced as a commercial trade. This design would have been transferred to the fabric using the block printing method. And later on washed to remove the color once the embroidery was completed.


This is my first creation! It was done on a semi transparent cotton fabric. The primary stitch used here is Double back stitch worked with two strands of white embroidery floss. And the needle is just the regular crewel needle. You will get the same result with the Herringbone Stitch, but then you would have to work with the reverse side of the fabric facing you. You can see the holes that the stitches have made in the picture on the right. Creating holes is part of Chikankari.
The sample on the right is another attempt at Chikankari. I just couldn't resist using additional colors! :) It looks nice, doesn't it? :)

This is also done in Double back stitch using two strands of white embroidery floss.

Chikankari is unforgiving of knots. Take the time to make small knots. Another note - let's say you are making a flower. When you finish one petal, weave your needle through the petal to start the next one. If not, the ugly long piece of thread will show through!!

Well, I hope I have inspired you to try Chikankari. Happy embroidering!


You might also be interested in...
Embroidered Pillow CasesSamples of Arhi Work

8/26/09

Kasuti embroidery with a touch of gold.


Hello Readers,
It has been a while since my last posting. I apologize! A family holiday, end of summer and back-to-school for my son had kept me busy. Anyway, today's embroidery... Kasuti!

Checked fabrics are ideal for Kasuti embroidery. Here is a sample along with a design that you can print and try.

The design is a simple one. It is made even simpler with a checked fabric. The work is done using the double running stitch. In Kasuti, the double running stitch, when worked as a straight line is called Gavanthe. And when used in a zig zag way (that looks like little steps), it is called Muragi. The design is identical on both sides of the fabric. In the end, I added 'stars' and tiny French knots in gold thread.

Since I chose a fabric with large squares, I had enough room for the additional embellishment. But this is optional. The design will look equally nice on a plain fabric as well. You are welcome to print the design, trace it or use it as is along with the instructions.

If Kasuti is new to you, please take a look at the Kasuti Tutorial before you begin. It explains the double running stitch.

Instructions.

* First, start at the center and work on any one of the four straight lines that has the diamond at the end (the white thread in the sample) using the double running stitch. You will always end and start again at the center. Complete the other three lines. End on the reverse side.
* Next, choose any one corner of the 'three diamond' diagonal line (the black thread in the sample), close to the center of the design. Follow the design, going up and down all the way to the end and come back to finish it. You will come back to the point where you started. Then follow along on the square and make your way to the second diagonal line (there will be gaps in the square that you can fill in later). Complete the third and fourth diagonal lines in the same way. After you finish the fourth line, go backwards to finish the square. End on the reverse side.
* To finish the last step, i.e the zig zag lines worked in the green thread, you will have to work on each part separately. Choose one part, follow the design and when you reach the end, work backwards to fill the gaps. End on the reverse side as neatly as possible. Cut the thread and move to the next part.

You might also be interested in...
Kasuti - Pride of KarnatakaKasuti Tutorial