12/14/09

Holiday Wishes with Embroidered Cards

Hello Readers,

It is that time of the year when most of us like to mail out cards wishing family and friends, even if we may not do it on a regular basis. E-cards are convenient, but there is a charm in sending an actual card. It is something that people proudly display in their houses and hold on to, for a long long time.

This year, why not make the Holidays extra special by embroidering your favorite designs on your greeting cards? Take a look at the designs in this post. You can embroider something simple in a short time or you can create something really really stunning if you have an hour or so to spare.

I have tried to keep the holiday colors in the cards - red and green. Three of the designs are in the Kasuti style. I began this project by embroidering on a piece of Aida fabric, which is stiff and can easily be mounted on to a card. It turned out quite well, but I like the embroidery better on the card itself.

Snowflake in Kasuti.

I used two strands of cotton embroidery thread and it took me about twenty minutes or so to complete the design. Embroidering on cards is actually quite simple. It will help if you punch-in the design with a needle before you begin.

Another snowflake in Kasuti.

This was done using rayon thread. I liked the rayon thread better for this project.

Hanging ornaments in Kasuti.

Using gold thread was my son's idea. He loves that thread!
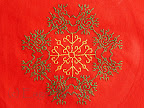
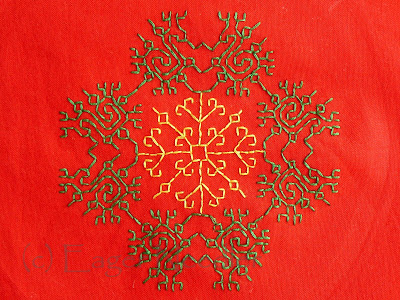
I kept my favorite for last! I borrowed this design from a Chikankari design book, and used running stitch and back stitch to cover the design. It took me about 45 minutes to complete this piece.

And finally here's wishing you all! You can click here for a bigger image.


11/30/09

Samples of Arhi work.

This is a follow up to my earlier posting on the Arhi Embroidery (Tambour Needle).

Today I would like to share a couple of samples. The first sample is a bright colored letter holder. I am sure many of you may have seen similar products at the Handicrafts fairs in India. This letter holder is made of cotton fabric and the chain stitch is done using cotton threads.

Isn't the craftsmanship beautiful? The design is well laid out, the choice of colors are good and the embroidery is very neat! A lot of care went into making this piece.

Click here to see the details.

Here is another sample of Arhi work on a salwar-kameez. Much of the distortion that you see is because the fabric kept slipping away while I was trying to photograph it. That said, there is a slight irregularity in the workmanship, probably because the fabric was stretched too tight. But overall, this piece has no flaws that stand out. Scroll down to view a close-up image of this embroidery.

The chain stitch is done using silk threads and the fabric is synthetic. The sequins are also attached using the Arhi. The stitches are small and even in size throughout the design. That is the advantage of using the arhi or the tambour needle. I like the choice of silk thread for this sample. It complements the luster of the synthetic fabric very well.

Click here if you want to read the earlier posting .

11/23/09

Kasuti - Circle of Friends.

I received an e-mail from a friend this morning reminiscing our childhood days and India as it was in the 80's and 90's. Remember that time? There was one phrase in the e-mail that stayed in my mind all day. "We called on friends to come out and play, never rang the door bell, just went through the back door." I am also guilty of this!! I have been very fortunate to have had a great circle of friends throughout my childhood. So today's embroidery is a creation remembering all those good times with my "Circle of Friends".


If you wish to try this piece of Kasuti embroidery, here is the design and the instructions for it.

Click here if you want to print it.

11/14/09

My experiment with the Tambour needle.

Tambour needle is the same as arhi or the cobbler's needle that is used extensively in Indian embroidery. It makes only one type of stitch - the chain stitch. For a long time I have had this desire to learn to use the tambour needle. So I bought myself a kit and began experimenting with it. I imagined that I would be sipping hot tea, listening to music, and working at ease at my homemade tambour frame. On the contrary, I was barely able to hold the thread in my left hand and twist the needle with the right! Eventually I did succeed, minus the tea and the music of course!
This is the tambour kit. It came with three needles of different sizes and an instruction sheet. The screw is used to change the needles.

Last weekend, I sat down to embroider a small design using the arhi, mostly to see if I would last that long. Here is the result. Initially it was a little challenging but when I was about halfway done, I actually started loving it!


Click here to view a larger image.


In India, arhi was originally used in the states of Gujarat and Kashmir. Now it is used by craftsmen in other states as well. In Gujarat it is believed to have started by the Mochi community (Mochi being cobbler), which primarily stitched shoes with similar needles. This technique seems to have been passed on to the Ahir community which became quite well known for their Kutchi Bharat. Their work is quite stunning! I have some samples and I will post them in a few days. Generally speaking, embroideries from Gujarat are bright with mostly primary and secondary colors (Blue, red, yellow, orange, green and purple). However, white and black are also used in Kutchi Bharat. The chain stitch is very small and is done using either cotton or silk threads (I can't imagine working with silk thread without damaging it). Arhi work can be seen on clothing, bed linen, wall hangings, letter holders, bags and so on.

In Kashmir, the embroidery done with the arhi is called Kashmiri Kashidas and quite different from the arhi work of Gujarat. The designs are mostly paisley and the thread colors, lighter. Crewel wool is used instead of cotton and silk. I will post a separate article on Kashmir embroidery so you can see the difference.

Lastly, my thoughts on the Tambour: There is a learning curve in using a tambour needle, no doubt about it. But once you cross that, it is great for working large pieces of embroidery and fast. Tambour means drum (I think in French!). It is rightly named for a frame, because the fabric has to be held as tight as a drum in order to embroider with ease. It is best if you use a frame so you have both hands free. If you choose to work with a hoop, make sure that the fabric is taut and that you can rest the hoop somewhere so that both hands are free (it is not impossible, but will slow you down).

Try it -you'll enjoy the experience!


You might also be interested in...
From the city of the NawabsKasuti - Circle of Friends

11/9/09

Resources

Here is a list of websites that may be of interest. I will try to update this page as often as possible.

11/3/09

Books.

I love to read and I am always looking for new books and references. So here is a list of some books that I found to be useful. These books have also been a great source of inspiration.

I have read all the books listed on this page, but if you're wondering whether I own all of them, the answer is NO! (I wish I did!! :))

  • Reader’s Digest Complete Guide to Embroidery Stitches.
  • The Encyclopedia of Stitches: With 245 stitches Illustrated and 24 Exquisite Projects, by Karen Hemingway.
  • Reader’s Digest Complete Book of Embroidery. Includes Crewelwork, Goldwork, Ribbon Embroidery, and Embellishment by Melinda Coss.
  • Embroidery Techniques and Patterns by Marie-Noëlle Bayard.
  • Blackwork by Mary Gostelow.
  • Creative Surface Design by Sandy Scrivano.

10/30/09

Kurti with Kutch embroidery.

My last trip to the mall motivated me to start sewing again. Motivation from lack of finding what I was looking for in the color of my choice, in my size, and of course in my price range. I enjoy sewing as much as embroidering, but since both of these actitvities need time, and plenty of it, I don't get to do it as often as I'd like to. But I hope to sew more often from now on.


The Kurti on the left was actually made for checking the pattern. After I stitched it and tried it on, the fit wasn't bad at all, except for a couple of small changes. So, I decided to keep it, BUT after some embroidery on it! As you can see, the print is a little busy (I mean it has very little white space). So I wanted to go with something simple and not more than an inch wide. Also, since the top was fully stitched I had some limitations on what I could do. My choice - a row of Kutch stitches evenly spaced all around the neckline along with a border.


This photo shows the whole embroidery in more detail. I used chain stitch for the border and stitched a decorative button in the center for some added interest.


This one is a close up of the individual kutch stitches.


Have a good weekend folks! Happy embroidering!


You might also be interested in...
Mirror Work Tutorial in Buttonhole StitchIntro to Kantha

10/14/09

Diwali Wishes!

Diwali crept up on me when I was busy contemplating the next style. So here is a little creation observing the festival. Have a fun filled Diwali, everyone!

The special stitch on this piece... Coral Stitch for the fireworks. They are really great when you want both length and stability. I will post the tutorial for this stitch in a few days.

Ah! this photo. I found these little pot shaped lamps at a local fair just a few weeks ago. It will be a good change from the tea candles I use every year.

10/5/09

A closer look at the Dasara Embroidery...

Hope all of you had a wonderful Dasara! This year, my husband and I set up a small "Children's Golu" for my son. I call it that because I did not have the traditional dolls with me and so the children's park and zoo became the main theme. I also had to keep it safe for my eight month old daughter. The display turned out quite well and we all had a fun time. I look forward to doing it again, perhaps bigger next year.
Anyways, I wanted to highlight a couple of filling stitches that I used in the "Kalasha" Embroidery. One is the Satin Stitch used for the mango leaves and the other is the Long and Short Stitch used for the coconut. The tutorials for both are posted in the Stitches section. Check them out!

Satin stitch, also known as Damask Stitch works very well as a filling stitch. It provides a smooth finish, and since the stitches are all so close together the texture of the thread can be used to its advantage. Satin Stitch is used In Indian Embroidery quite a bit. This stitch has a lot of variants and the Long and Short stitch is one of them. The long and short stitch is also great for covering large areas. I used this stitch in just one color, brown, along with a few streaks of black, but this stitch is more effective when used in creating those subtle shades that you see in nature. It really brings a leaf, a flower and other such elements to life.

Tutorial Picture of Satin Stitch


Tutorial Picture of Long and Short Stitch.


A glimpse of our display. I will leave the rest to your imagination!! :)
Have a nice week, everyone!
.

9/20/09

Happy Dasara!


Dasara brings such warm memories of childhood that it makes me want to be a kid again! Today's embroidery, 'Kalasha' is symbolic of Dasara as it is celebrated in South India. 'Kalasha' is a metal pot inside which are a few neatly tucked mango leaves and a coconut in the center. To me the embroidery also reminds me of my grandma. She lived in Chennai and would visit us every summer. During her stay, she would make me a special 'Kalasha' for the 'Golu' (Another South Indian tradition of proudly displaying one's collection of clay dolls, heirloom artifacts, travel souvenirs in steps). In our house, the centre piece was always grandma's meticulously decorated 'Kalasha' made from a few simple things - plastic pot, rubber ball, large gold sequins and of course, tons of pins!!

Well, whatever fond memories Dasara may bring to you, here is wishing everyone a Happy festival season!


9/10/09

From the City of the Nawabs...

Today, we travel to Lucknow, a busy city in the state of Uttar Pradesh. This city is worth visiting for two reasons. One, the amazing monuments and second, (more important!) to shop for some beautiful Chikankari work.

Chikankari is the Indian version of Whitework and Shadow work. The designs used are generally flowers and creepers. Another very common design is the mango. The embroidery is done predominently using white cotton thread on white fabric and other pastel shades of fabrics. This style also seems to fit the description of Shadow work because it is done on transparent and semi transparent fabrics like poplin, voile and chiffon. There are many stitches used in Chikankari, some specifically for the outlines, and others for filling the pattern to create the shadow. Besides this, there are the raised stitches that stand out quite well against the flat stitches and of course the jali work.

I have barely scratched the surface of this style and I have a long way to go in exploring and experimenting. Take a look at today's samples.

This piece is probably 8 years old
and is still one of my favorites. I bought it in a small store in
Bangalore. If you ignore the pilling
in the fabric, the embroidery looks bright to this day.

Chikankari has always been practiced as a commercial trade. This design would have been transferred to the fabric using the block printing method. And later on washed to remove the color once the embroidery was completed.


This is my first creation! It was done on a semi transparent cotton fabric. The primary stitch used here is Double back stitch worked with two strands of white embroidery floss. And the needle is just the regular crewel needle. You will get the same result with the Herringbone Stitch, but then you would have to work with the reverse side of the fabric facing you. You can see the holes that the stitches have made in the picture on the right. Creating holes is part of Chikankari.
The sample on the right is another attempt at Chikankari. I just couldn't resist using additional colors! :) It looks nice, doesn't it? :)

This is also done in Double back stitch using two strands of white embroidery floss.

Chikankari is unforgiving of knots. Take the time to make small knots. Another note - let's say you are making a flower. When you finish one petal, weave your needle through the petal to start the next one. If not, the ugly long piece of thread will show through!!

Well, I hope I have inspired you to try Chikankari. Happy embroidering!


You might also be interested in...
Embroidered Pillow CasesSamples of Arhi Work

8/26/09

Kasuti embroidery with a touch of gold.


Hello Readers,
It has been a while since my last posting. I apologize! A family holiday, end of summer and back-to-school for my son had kept me busy. Anyway, today's embroidery... Kasuti!

Checked fabrics are ideal for Kasuti embroidery. Here is a sample along with a design that you can print and try.

The design is a simple one. It is made even simpler with a checked fabric. The work is done using the double running stitch. In Kasuti, the double running stitch, when worked as a straight line is called Gavanthe. And when used in a zig zag way (that looks like little steps), it is called Muragi. The design is identical on both sides of the fabric. In the end, I added 'stars' and tiny French knots in gold thread.

Since I chose a fabric with large squares, I had enough room for the additional embellishment. But this is optional. The design will look equally nice on a plain fabric as well. You are welcome to print the design, trace it or use it as is along with the instructions.

If Kasuti is new to you, please take a look at the Kasuti Tutorial before you begin. It explains the double running stitch.

Instructions.

* First, start at the center and work on any one of the four straight lines that has the diamond at the end (the white thread in the sample) using the double running stitch. You will always end and start again at the center. Complete the other three lines. End on the reverse side.
* Next, choose any one corner of the 'three diamond' diagonal line (the black thread in the sample), close to the center of the design. Follow the design, going up and down all the way to the end and come back to finish it. You will come back to the point where you started. Then follow along on the square and make your way to the second diagonal line (there will be gaps in the square that you can fill in later). Complete the third and fourth diagonal lines in the same way. After you finish the fourth line, go backwards to finish the square. End on the reverse side.
* To finish the last step, i.e the zig zag lines worked in the green thread, you will have to work on each part separately. Choose one part, follow the design and when you reach the end, work backwards to fill the gaps. End on the reverse side as neatly as possible. Cut the thread and move to the next part.

You might also be interested in...
Kasuti - Pride of KarnatakaKasuti Tutorial


8/3/09

Decorative Kutch Work Borders

As I began my work on a new style yesterday, I had a change of heart. I decided to work on a couple of simple Kutch designs instead. Kutch work lends itself very well to many many designs. Here are a couple of design ideas that you could use on borders or bands.


Click here to learn this embroidery.

It was my five year old's idea to make the designs a little more colorful! He has always been curious about why I insist on using a single color thread when there is a whole basket to choose from. Well, this time I agreed to do it in the spirit of continous improvement. I think the tutorials have turned out quite well. Enjoy!!


Click here to learn this embroidery.

Kutch is usually done with a single color thread. But if you like to use two contrasting colors, go right ahead!

Before you leave this page, a question to ponder over readers ........ Why are some styles more popular than others? I think they are all equally wonderful! Yet, I find Kutch work for instance, to be one of the sought-after styles. Any thoughts? I would love to hear from you.


7/22/09

Mirror Work in Cretan Stitch

Here is another beautiful way of attaching mirrors - using Cretan Stitch. It is decorative, super simple and it takes just under 5 minutes to attach one mirror. Try the tutorial.


7/6/09

Kasuti - The pride of Karnataka

'Kasuti' is a style of embroidery that is practiced in the southern state of Karnataka. It is a form of counted thread embroidery.
Kasuti uses just one stitch, the running stitch. It has some unique characteristics - geometrical patterns, two thread colors and use of single strand. Motifs are similar to other styles and include chariots, temples, peacocks and flowers but they are altered so that the patterns are geometrical. If you understand the underlying concept, the embroidery is very simple and you can cover large areas in a short period of time. Kasuti work is quite popular on silk sarees and kurtas.

I suggest using a a graph paper to draw designs and a netted fabric to embroider the first few designs. The tutorial posted is done on a netted fabric.

As I write this blog, I am reminded of one of my friends in college who took such a strong liking to Kasuti that she became a full time Kasuti designer/embroiderer. It is indeed a 'cool' style!


You might also be interested in...
Holiday wishes with Embroidered CardsToday we travel to the Nilgiris

6/23/09

Kutch Tutorial Videos

If you would like to try the large Kutch design featured in my last post, take a look at these Kutch Tutorial videos I put on YouTube...


6/2/09

Kutch Design - Completed and framed!


There are many end uses for a good piece of embroidery.

You could use it on table mats, cushion covers, pillow covers, letter holders OR simply hang it up on the wall!

The photo on the left is a temporary 'digital' place holder while I shop for a suitable photo frame.


Completed Kutch Design

5/26/09

Kutch Design - Work in Progress


Here's something that I am working on right now.


In the center I have an elaborate Kutch embroidery and on all four sides just basic Kutch worked on diamond prints. I have used back stitch to connect them.
I also added more diamonds in the center to fill up some of the green space. I am not sure how they will be filled at this point. I will post my completed work ASAP!